Graduation season is one of those magical times of year that fills the air with hope, pride, and a touch of nostalgia. I still remember the first time I attended my cousin’s high school graduation—cap and gown, beaming smiles, and that electric buzz of new beginnings. But what stood out most wasn’t just the ceremony; it was the vibrant money lei she wore around her neck, a cascade of crisp bills folded into flowers, adorned with ribbons and beads. It was practical, thoughtful, and oh-so-festive. That moment sparked my love for crafting money leis, and today, I’m sharing everything I’ve learned about how to make a money lei for graduation—a gift that’s equal parts sentimental and celebratory.
If you’re looking for a unique way to honor a graduate, a money lei is the perfect blend of creativity and practicality. It’s a gift that says, “I’m proud of you, and here’s a little something to kickstart your next chapter.” In this guide, I’ll walk you through the step-by-step process of making a money lei, share personal tips and tricks, and sprinkle in some heartfelt reflections to inspire you. Whether you’re a seasoned crafter or a total beginner, this project is approachable, fun, and guaranteed to make your graduate feel special.
Why a Money Lei is the Ultimate Graduation Gift
Before we dive into the how-to, let’s talk about why a money lei is such a standout choice. Graduations mark monumental milestones—high school, college, or even graduate school. It’s a time when graduates are dreaming big but often worrying about what’s next: college tuition, moving costs, or just figuring out life as an adult. Cash is always appreciated, but handing over a stack of bills in an envelope can feel a bit… impersonal.
A money lei transforms that cash into a work of art. It’s a gift that shows effort, thoughtfulness, and a dash of flair. In many cultures, especially in Hawaii, leis symbolize love, respect, and celebration, making them a fitting tribute for a graduate’s hard-earned achievement. Plus, let’s be honest—it’s a total crowd-pleaser. I’ve seen graduates light up when they receive a money lei, not just because of the cash but because it’s a keepsake they’ll remember long after the money is spent.
When I made my first money lei for my best friend’s college graduation, I was nervous. Would it look cheap? Would the bills stay in place? But the look on her face when I draped it around her neck—pure joy—was worth every minute of folding and taping. That’s the magic of a money lei: it’s a gift that carries your heart along with it.
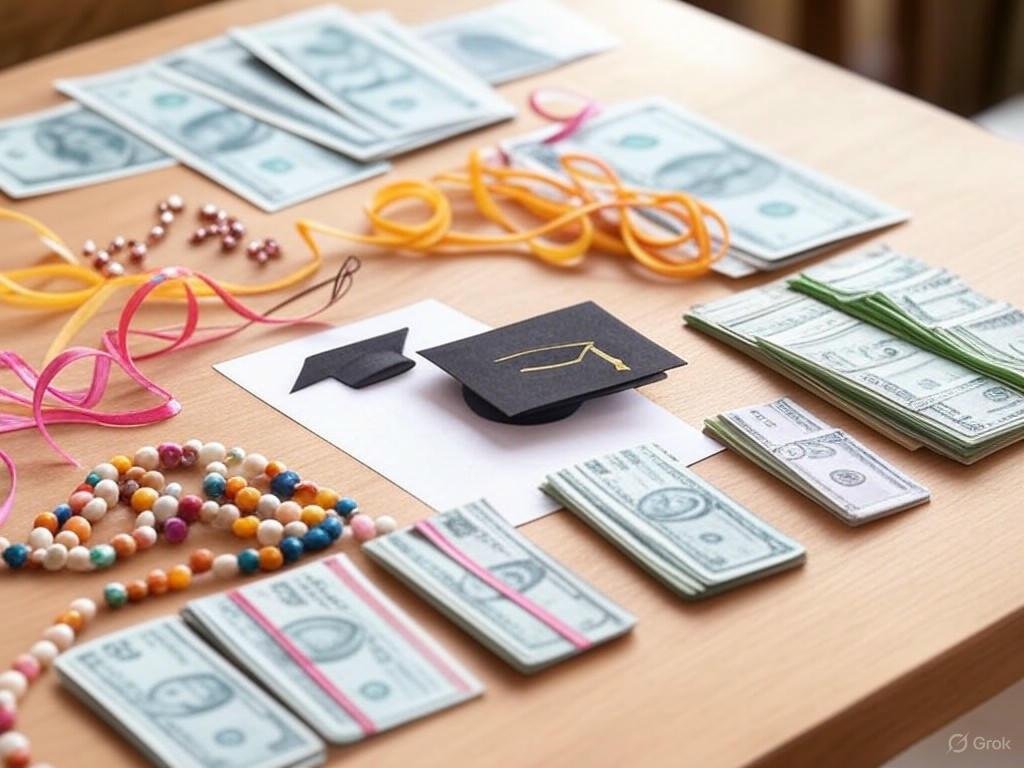
What You’ll Need to Make a Money Lei
Let’s get to the good stuff: crafting your money lei. The beauty of this project is that it doesn’t require fancy tools or a big budget. Most of the supplies are probably already in your home, and the rest are easy to find at a craft store or online. Here’s what you’ll need to create a stunning money lei for graduation:
Cash: Crisp, new bills work best for a polished look. I typically use $1 bills for a fuller lei, but you can mix in $5s, $10s, or even $20s if you’re feeling generous. Plan for 30–50 bills, depending on how long and lush you want the lei to be.
Ribbon: A sturdy, 1-inch-wide satin or grosgrain ribbon in the graduate’s school colors adds a festive touch. You’ll need about 3–4 yards.
Beads: Small plastic or wooden beads add texture and charm. Go for colors that complement the ribbon or match the graduation theme.
Scissors: For cutting ribbon and trimming any excess.
Tape: Double-sided tape or clear tape to secure the bills without damaging them.
Optional embellishments: Silk flowers, small charms, or mini tassels can elevate the lei’s look.
Patience and a playlist: Crafting is more fun with your favorite tunes in the background. Trust me, it makes the folding process fly by!
Pro tip: If you’re using brand-new bills, ask your bank for uncirculated ones. They’re crisp and easier to fold, giving your lei a professional finish. I learned this the hard way after wrestling with some crinkled bills that refused to cooperate!
Read more: AI Agents 2.0 Review – Next Generation Insights
Step-by-Step Guide: How to Make a Money Lei for Graduation

Now, let’s break down the process into manageable steps. I’ve refined this method over years of trial and error, and it’s beginner-friendly while still producing a lei that looks like it came from a boutique. Grab your supplies, put on some music, and let’s get started.
Step 1: Plan Your Design
Before you touch a single bill, take a moment to envision the final product. Do you want a simple lei with just bills and ribbon, or a more elaborate one with beads and flowers? Are you sticking to the graduate’s school colors, or adding a pop of sparkle for extra flair? I like to sketch a quick design or lay out my materials to get a sense of the color scheme.
For my cousin’s lei, I chose navy and gold ribbon to match her school colors, with white beads for contrast. It helped to have a clear vision before I started folding, so I didn’t waste time undoing mistakes.
Step 2: Fold the Money into Flowers or Accordions
The heart of a money lei is the bills, and there are two popular ways to fold them: into flowers or accordion-style fans. Both are beautiful, but flowers take a bit more time. Here’s how to do each:
#### Flower Fold
1. Take a crisp bill and fold it in half lengthwise to create a crease, then unfold it.
2. Fold each corner inward toward the center crease, forming a pointed shape at both ends.
3. Fold the bill in half again along the center crease, with the pointed ends tucked inside.
4. Gently curl the folded bill into a petal shape and secure the base with a small piece of tape.
5. Repeat with 3–5 bills to create a full flower, then tape them together at the base.
#### Accordion Fold
1. Fold the bill back and forth in 1⁄2-inch increments, like a fan.
2. Pinch the center of the folded bill to create a bow-tie shape.
3. Secure the center with a small piece of tape or a tiny elastic band.
4. Fluff out the ends to give it a fuller look.
I usually mix both styles for variety—flowers for a fancier touch and accordions for a quicker, fuller lei. When I made a lei for my nephew’s graduation, I used mostly accordion folds because I was short on time, and it still looked stunning.
Step 3: String the Lei
Cut a piece of ribbon about 3–4 feet long, depending on how long you want the lei to be. This will be the base that holds everything together. Here’s how to assemble it:
1. Tie a knot at one end of the ribbon to act as a stopper.
2. Slide on a bead, followed by a folded bill (flower or accordion). If you’re using flowers, thread the ribbon through the taped base.
3. Add another bead to separate the bills and keep them in place.
4. Continue alternating beads and bills until the lei is the desired length. Space them evenly for a balanced look.
5. Tie a knot at the other end to secure everything.
I like to leave a little extra ribbon at both ends so I can tie the lei into a loop when it’s done. It makes it easier to drape over the graduate’s shoulders.
Step 4: Add Embellishments
This is where you can let your creativity shine. Thread on silk flowers, mini tassels, or charms between the bills for extra pizzazz. For my friend’s lei, I added tiny gold star charms to symbolize her bright future, and she loved the personal touch.
Be careful not to overdo it—less is often more. The bills should be the star of the show, with embellishments playing a supporting role.
Step 5: Final Touches
Once your lei is assembled, give it a gentle shake to make sure everything is secure. Adjust any bills that look crooked or uneven. If you want to make it extra special, tie the ends of the ribbon into a bow or add a small card with a heartfelt note.
When I gave my cousin her lei, I tucked a note into the ribbon that said, “Congrats on soaring to new heights!” She still talks about how much that meant to her.
Tips for Making Your Money Lei Stand Out
Over the years, I’ve picked up a few tricks that take a money lei from good to unforgettable. Here are my favorites:
Mix denominations: If your budget allows, use a variety of bill denominations to add visual interest. A few $5s or $10s scattered among $1s make the lei feel more luxurious.
Personalize it: Incorporate the graduate’s initials, favorite colors, or small trinkets that reflect their personality.
Practice folding: If you’re new to this, practice folding a few bills before you start the real thing. It’ll save you frustration.
Keep it lightweight: A heavy lei can be uncomfortable to wear. Aim for a balance of fullness and wearability.
Store it carefully: Place the finished lei in a large ziplock bag or a flat box to keep it pristine until the big day.
One of my proudest moments was when a friend’s mom asked me to teach her how to make a money lei after seeing the one I made for her daughter. It felt like passing on a little piece of joy.
Read more: Online Jobs for Students to Earn Money at Home – A Comprehensive Guide
Common Mistakes to Avoid
No one’s perfect, and I’ve made my fair share of mistakes while crafting money leis. Here’s what to watch out for:
Using worn bills: Old, crumpled bills are harder to fold and don’t look as polished. Splurge on new ones if you can.
Over-taping: Too much tape can make the lei stiff and bulky. Use just enough to secure the bills.
Skipping the beads: Beads aren’t just decorative—they help space out the bills and prevent them from sliding around.
Making it too long: A lei that’s too long can be cumbersome. Aim for a length that sits comfortably around the shoulders.
My first lei was a bit of a mess—uneven folds, too much tape, and a ribbon that kept slipping. But I learned from it, and each one I’ve made since has been better than the last.
Why This Project Means So Much to Me
Crafting a money lei isn’t just about following steps—it’s about pouring your heart into something tangible. Every time I sit down to make one, I’m reminded of the graduates I’ve celebrated and the milestones we’ve shared. There’s something deeply satisfying about turning a stack of bills into a symbol of love and pride.
When I made a lei for my little brother’s high school graduation last year, I got a bit emotional. He’d worked so hard, and I wanted him to know how much I believed in him. As I folded each bill, I thought about all the late-night study sessions, the laughter, and the dreams he was chasing. Handing him that lei during his ceremony was one of those moments I’ll cherish forever.
Read more: OpenApp AI Review – Insights and Analysis
How to Present Your Money Lei
The presentation is just as important as the lei itself. Here are a few ideas to make the moment special:
Drape it during the ceremony: If allowed, place the lei around the graduate’s neck right after they receive their diploma. It’s a classic and emotional moment.
Pair it with a card: Write a heartfelt note to go with the lei, sharing your pride and hopes for their future.
Gift it at a party: Present the lei during a graduation party for a big reveal. It’s sure to be a hit with the crowd.
I love the tradition of draping the lei during the ceremony—it feels like a public declaration of love and support. Just check with the venue first to make sure it’s okay.
Variations on the Money Lei
Once you’ve mastered the basic money lei, you can experiment with variations to suit different occasions or preferences:
Candy lei: Intersperse small wrapped candies with the bills for a sweet twist.
Photo lei: Add small printed photos of the graduate’s journey, tucked between the bills.
Minimalist lei: Use fewer bills and more ribbon for a sleek, modern look.
For my niece’s graduation, I made a candy lei with her favorite chocolates mixed in. She was thrilled, and it added a playful vibe to the gift.
Where to Find Inspiration
If you’re feeling stuck or want to take your lei to the next level, there’s no shortage of inspiration online. Pinterest is a goldmine for money lei designs, with everything from simple to extravagant styles. YouTube tutorials are great for visual learners—I’ve watched my fair share to pick up new folding techniques. And don’t underestimate the power of asking friends or family for ideas. Sometimes the best designs come from a quick chat over coffee.
Final Thoughts: A Gift That Keeps on Giving
Making a money lei for graduation is more than just a craft project—it’s a way to celebrate someone’s hard work, show your love, and create a memory that lasts. It’s a gift that combines practicality with heart, and it’s something you can personalize to make truly unique. Whether you’re crafting for a sibling, a friend, or your own child, the process is as rewarding as the final product.
As I write this, I’m already planning my next money lei for a friend’s upcoming graduation. I can’t wait to see her face when she sees it—a cascade of bills, ribbons, and love, all wrapped up in one beautiful package. I hope this guide inspires you to try making a money lei of your own. It’s a small gesture that carries a big impact, and I promise, it’s worth every moment you put into it.
So, grab those crisp bills, pick out some ribbon, and let your creativity flow. Your graduate deserves a gift as special as they are, and a money lei is the perfect way to show it. Happy crafting, and congrats to the grads!